Quantity Slab Discount is available under the Advanced Discount Module. To use this feature, the Advanced Discount Module must be enabled for the business.
This discount type lets you set different unit prices based on purchase quantity.
Meaning: when quantity increases, the selling price can reduce automatically.
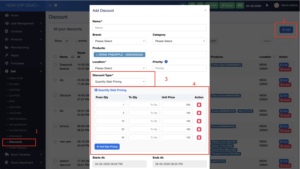
Step 1: Open Discount Page
From the left sidebar: Sell → Discounts
This opens the Discount list page.
Step 2: Click Add
Click the + Add button on the top-right side.
A popup window named Add Discount will open.
Step 3: Fill Discount Basic Details
Fill the required fields:
| Field | What to enter |
|---|---|
| Name | Discount name, e.g. Pineapple Slab Discount |
| Brand | Select brand if applicable |
| Category | Select category if applicable |
| Products | Select the product/products for this discount |
| Location | Select the business location |
| Priority | Used when multiple discounts apply (Default is 1) |
Important: Products and Location should be selected correctly. Otherwise, the discount may not apply during sale/POS.
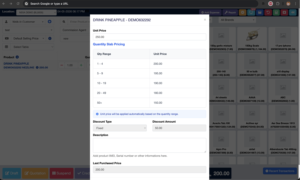
Step 4: Select Discount Type
In Discount Type, choose: Quantity Slab Pricing
After selecting this, the Quantity Slab Pricing table will appear.
Step 5: Add Quantity Slabs
In the slab table, enter quantity ranges and unit prices.
Example setup:
| From Qty | To Qty | Unit Price |
|---|---|---|
| 1 | 4 | 200 |
| 5 | 9 | 195 |
| 10 | 19 | 190 |
| 20 | 49 | 180 |
| 50 | leave empty or max qty | 150 |
Correct way to understand it
- From Qty = starting quantity for that price.
- To Qty = ending quantity for that price.
- Unit Price = price per item for that quantity range.
Example:
If customer buys 7 units, system should apply 195 as unit price.
If customer buys 25 units, system should apply 180 as unit price.
Step 6: Add More Slabs
Click: + Add Slab Pricing
Use this when you need more quantity levels.
Use the red delete icon to remove unnecessary rows.
Step 7: Set Start and End Date
At the bottom, select:
| Field | Purpose |
|---|---|
| Starts At | When the discount becomes active |
| Ends At | When the discount expires |
Make sure the current date is inside this range. Otherwise, the discount will not work.
Step 8: Save the Discount
After entering all details, click the save button at the bottom of the popup.
Important Validation Rules
Before saving, check these:
- No overlapping quantity ranges
Wrong example:1–10and5–20 - No missing ranges unless intentional
Example:1–4,5–9,10–19is clean. - Unit price must be lower or equal for higher quantity
Example:1 = 200,5 = 195,10 = 190 - Product and location must match POS/Sale location
- Discount date must be active