The HR module in the NEXA ERP system is loaded with features to handle all aspects of personnel management, including recruitment payroll, attendance, leave management, setting sale targets along many other critical operations.
After you have installed & configured Essentials module you will see the HRM menu along with Essentials menu in the left sidebar.
HRM modules consist of:
- Leave types & Leaves.
- Attendance
- Payroll
- Holiday
- & related settings
Leave Management
- Add leave: Leave Type(dropdown list), Start Date, End Date, Leave type, Reason (text area)
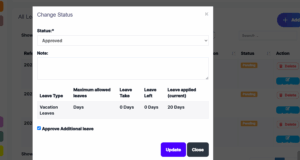
- Default status of a leave added is pending
- Admin can change the status: status(pending, canceled, approved) by clicking on the leave status column button.
- Inbuilt app Notification will be sent to admin when a new leave is added.
- Inbuilt app Notification will be sent to the applied user when the status is changed by the admin.
- Only admin can delete a leave.
- Reference no. Will be generated automatically for every leave to uniquely identify them. You can change the reference no prefix from HRM -> Settings (Leave Reference No. prefix)
- Leave Instructions: You can enter special instructions for users before applying for leaves from the settings “Leave Instructions” field.
Leave Types
- Only admin can manage leave type (add or edit)
- Fields:
- Leave Type: Enter the name of the type of leave.
- Max leave counts: Maximum number of leaves allowed for the leave type.
- Leave count interval: This can be “Current month” or “Current financial year” or “None”. It is the interval for the maximum leave counts.
For example: If employees can take 12 Sick Leave in 1 year then:
Leave Type = “Sick Leave”
Max leave counts = 12
Leave count interval = “Current financial year”
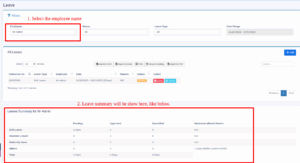
Leaves Summary for an user
- For admin: Admin can view leave summary of all other users. On the leaves page filter by an employee name and it will show the summary at the bottom of the page.
- For Users: Always visible to a user his/her summary.
Leaves Approval for an user
When an user applies a leave, the admin can approve or cancel it.
To do this,
Step 1: Go to HRM Module > Leaves.
Step 2: Here you can edit the status of the leaves.
Approval of Additional leaves
If users apply additional leaves than the limit permitted by leave type, these leaves can be approved by enabling the “Approve Additional Leaves” checkbox.
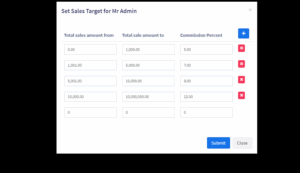
What is a Sales target?
Sales target helps businesses to give target-based incentives/commissions to their employees or staff.
Using this business can define a different range or slab-based incentives.
For example:
- For sales from $0 to $1000, the commission percentage is 5%
- from $1001 to $5000, commission percentage is 7%
- from $5001 to $10,000, commission percentage is 9%
- from $10,000 to $10000000, commission percentage is 12%
This helps businesses to boost sales because employees or salespeople work hard to achieve a much higher percentage of commission.
Adding sales target
- Go to HRM -> Sales Target, click on ‘set sales target’
- In the popup, define the commission slab or target
- Here is a screenshot of the above example:
NOTE:Before setting the sales target, make sure to configure the Sales Commission Agent settings in Business Settings > Sales. Follow the steps mentioned in this document -> DocumentLink
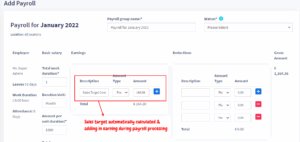
Calculating & Paying commission to employees
To pay commission to employees for sales targets, you need to process the payroll.
In payroll processing, it will have a separate column for sales target commission. Check the screenshot below:
Calculates sales target on sales amount excluding taxes
By default sales target will get calculated on amount including tax. To calculate it without tax go to HRM -> Settings -> Sales Target